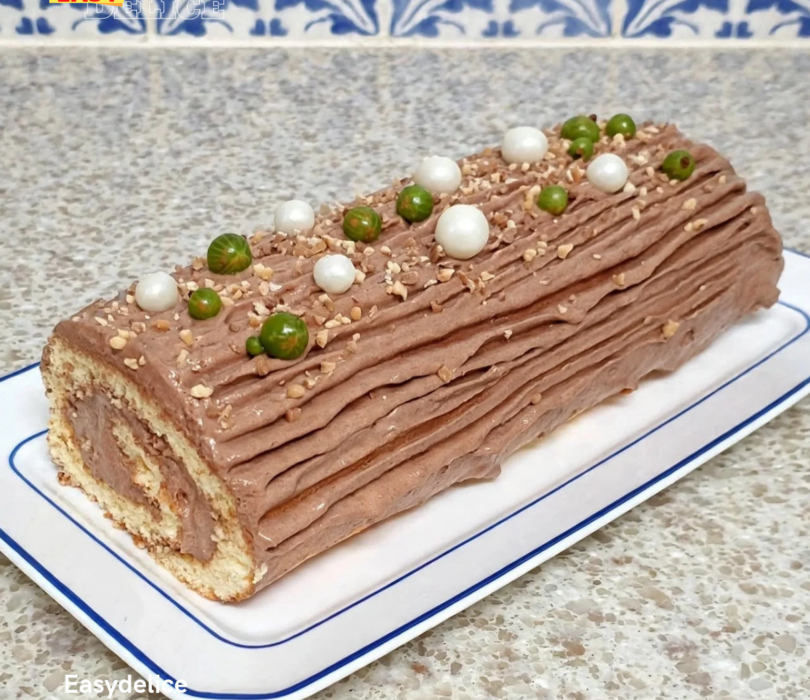


For the holidays or simply for a special occasion, this chocolate-hazelnut rolled log is a real treat for chocolate lovers! It consists of a light and soft rolled sponge cake, filled with a generous chocolate and hazelnut cream, then entirely covered with the same preparation to obtain a pretty bark effect.
Inside, the sponge cake remains tender thanks to a short baking time and a hot rolling technique. The buttercream, enriched with cocoa and hazelnut spread, provides a melt-in-your-mouth texture and an intense chocolate-hazelnut flavor. A few roasted hazelnuts and small decorations complete this yule log with a finish worthy of a fine homemade pastry shop.
❤️Why you’ll love this yule log
It combines a light sponge cake with a generous chocolate-hazelnut cream and a very elegant bark-like decoration. The assembly is straightforward, the ingredients are easy to find, and the result is spectacular on a festive table. A wonderful recipe for making a homemade yule log without any complicated assembly.
📋Recipe information
| Number of people | 8 to 10 people |
| Length | approximately 30 to 32 cm |
| Preparation | approximately 35 to 40 minutes |
| Cooking | 8 to 10 minutes |
| Rest in the cool | 1 hour minimum, ideally 2 hours |
| Mold or baking sheet | 30 x 40 cm plate |
| Difficulty | Average |
🛒Ingredients
To make a yule log of 30 to 32 cm, or about 8 to 10 generous slices, prepare the following ingredients:
For the rolled biscuit
- 4 eggs at room temperature
- 120g of granulated sugar
- 120g of T45 flour
- 1 pinch of salt
- 20g of melted butter (optional, to make it more pliable)
For the chocolate-hazelnut cream
- 250g of Nutella or quality hazelnut spread
- 200g of very soft unsalted butter, at room temperature
- 80g of unsweetened cocoa powder
- 60g of icing sugar
- 1 pinch of salt
For decoration
- 80 to 100 g of roasted and crushed hazelnuts
- A few pearls of white chocolate
- A few small green pistachio balls or edible decorations
- A few whole hazelnuts
👩🍳Step-by-step preparation
1. Prepare the baking sheet and the oven
Preheat the oven to 180°C using the fan setting . Line a 30 x 40 cm baking tray with baking paper, making sure to press it firmly against the edges.
Have all the ingredients ready. The eggs should be at room temperature to whip up easily and produce a light and airy biscuit.
2. Whisk the eggs and sugar
In a large mixing bowl or the bowl of a stand mixer, place the whole eggs, sugar and a pinch of salt.
Whisk at high speed for 8 to 10 minutes , until the mixture almost triples in volume, becomes very light and forms a thick ribbon.
To check the consistency, lift the whisk: the mixture should fall back slowly and leave a visible trail on the surface for a few seconds. This step is essential for obtaining a light biscuit without the need for baking powder.
3. Gently fold in the flour.
Sift the flour to avoid lumps and to make it easier to incorporate.
Add it in three batches to the egg mixture. Using a spatula, gently fold it in from the bottom up, rotating the bowl.
If you are using melted butter, let it cool slightly, then gently pour it down the side of the bowl. Mix just enough to incorporate it, without deflating the mixture.
The batter should remain light and airy. Avoid mixing for too long, as you risk losing the volume achieved with the whisk.
4. Spread and bake the biscuit
Pour the batter onto the prepared baking sheet and spread it gently with an offset spatula to obtain an even thickness of approximately 0.8 to 1 cm.
Bake at 180°C for 8 to 10 minutes . The biscuit should be lightly golden, soft to the touch and cooked enough to easily detach from the paper.
Monitor the baking carefully: an overcooked biscuit becomes dry and may crack when rolled.
5. Roll the biscuit while still warm
As soon as it comes out of the oven, immediately turn the biscuit over onto a clean tea towel, lightly sprinkled with sugar to prevent it from sticking.
Carefully remove the parchment paper. Starting from one of the longer sides, roll up the still-warm biscuit with the tea towel inside.
Allow it to cool completely in this position. Rolling it while still warm helps it take the desired shape and reduces the risk of cracking during assembly.
Page 1 of 3