

Remove the saucepan from the heat and add the 150g of flour all at once. Mix immediately and vigorously with a spatula until the flour is completely incorporated.
3. Dry the dough
Return the pan to medium heat and stir vigorously for about 1 minute 30 seconds.
The dough will gradually pull away from the sides of the pan and form a smooth ball. A thin film may appear at the bottom of the pan: this is a sign that the dough is sufficiently dried.
Remove from heat and transfer the dough to a bowl or to the bowl of a food processor fitted with the paddle attachment.
Mix for a few moments to allow some of the steam to escape and the dough to cool slightly.
4. Gradually incorporate the eggs
Beat the eggs in a bowl to make them homogeneous.
Add them gradually to the dough, in several batches, while mixing vigorously after each addition.
The dough should become smooth, shiny and pliable. It should form a thick ribbon and fall slowly from the spatula, forming a bird’s beak shape.
Chef’s tip: Don’t automatically add all 210g of eggs at once. The amount absorbed depends on the dryness of the dough and the type of flour used. Stop as soon as the right consistency is reached, even if a little beaten egg remains.
5. Arrange the mini wreaths
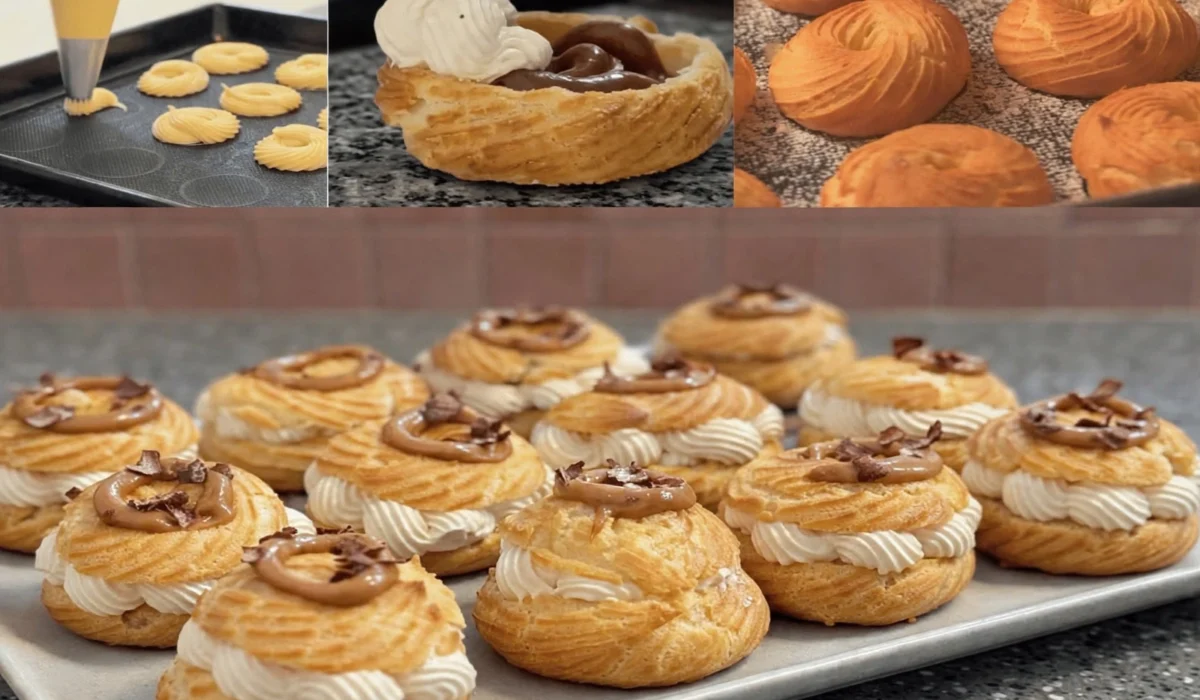
Transfer the choux pastry into a piping bag fitted with a plain or fluted nozzle.
On a baking sheet lined with parchment paper, form small, even rings 4 to 5 cm in diameter. Draw a circle, leaving a small space in the center, then make sure to keep all the pieces a similar size.
Leave enough space between the wreaths, as they will expand during baking. Depending on the size of your baking sheet, divide them into two batches.
6. Gild the wreaths
In a small bowl, mix the egg yolk with a little milk.
Using a brush, apply a thin layer of egg wash to the wreaths. Avoid letting the mixture drip down the sides of the pastry, as this could hinder its rising during baking.
If necessary, gently smooth out any small lumps of dough with the tip of a slightly damp finger.
7. Bake the mini Paris-Brest
Bake at 180°C in fan-assisted mode for approximately 25 to 28 minutes, until the crowns are well risen, golden brown and dry.
Avoid opening the oven door for the first 20 minutes: a drop in temperature could cause the cabbage to collapse.
At the end of baking, check that the wreaths are sufficiently dry inside. They should be well-risen and firm to the touch.
Remove them from the oven and carefully place them on a wire rack. Let them cool completely before filling them.
8. Prepare the light vanilla cream
Place the 250g of very cold full liquid cream in a very chilled bowl.
Add the 20g of icing sugar, then gradually whisk until you obtain a firm and airy whipped cream.
Take the 350g of cold pastry cream out of the refrigerator. Briefly whisk it to restore a smooth and supple texture.
First, incorporate one-third of the whipped cream into the pastry cream to loosen it.
Next, add the rest of the whipped cream in two batches, using a spatula, with delicate up-and-down movements.
You need to obtain a light, homogeneous cream that is firm enough to be piped using a piping bag.
9. Cut and decorate the wreaths
When the wreaths are completely cool, carefully cut them horizontally with a fine-serrated knife.
Remove the tops and place the bases on a tray or plate.
Transfer the light vanilla cream into a piping bag fitted with a fluted nozzle.
Generously fill each base by making pretty rosettes or regular movements all over the wreath.
Make sure to spread the cream evenly to obtain beautiful, generously sized pastries when cut.
10. Close and decorate with caramel-chocolate
Carefully replace the hats on the decorated wreaths.
If the salted caramel is too firm, gently warm it just enough to make it easy to use. It should remain thick and absolutely not be hot when you’re decorating.
Using a small spoon or a fine piping bag, place a loop of caramel on top of each mini Paris-Brest.
Immediately add a few dark chocolate shavings so that they adhere to the caramel.
Page 2 of 3